Dentrix Ascend and Jarvis: A Report Guide
Introduction
The following sections will highlight how the modules in Jarvis populate their data. You’ll discover how to compare data in Dentrix Ascend reports to the data in Jarvis so you can better understand the numbers you see. This will allow you to feel confident in Jarvis’ ability to structure and give useful insights into the trends and recommendations for your business.
Disclaimer
If your office or organization has customized any core metrics (Gross Production, Net Production, Adjustments, Collections, New Patients, or Patient Visits) please contact your Customer Success Manager for a customized report guide. The below report guide provides instructions based on the platform’s default metric definitions and calculations.
PMS Report Types
When comparing Dentrix Ascend reporting to Jarvis Analytics, it is critical that the PMS reporting is generated using the same report settings that Jarvis was configured with to ensure matching values between both platforms.
Dentrix Ascend’s integration to Jarvis Analytics using two different report settings, Modified Date, and Transaction Date. You will need to know your report type to compare data between the two systems.
What is your report type?:
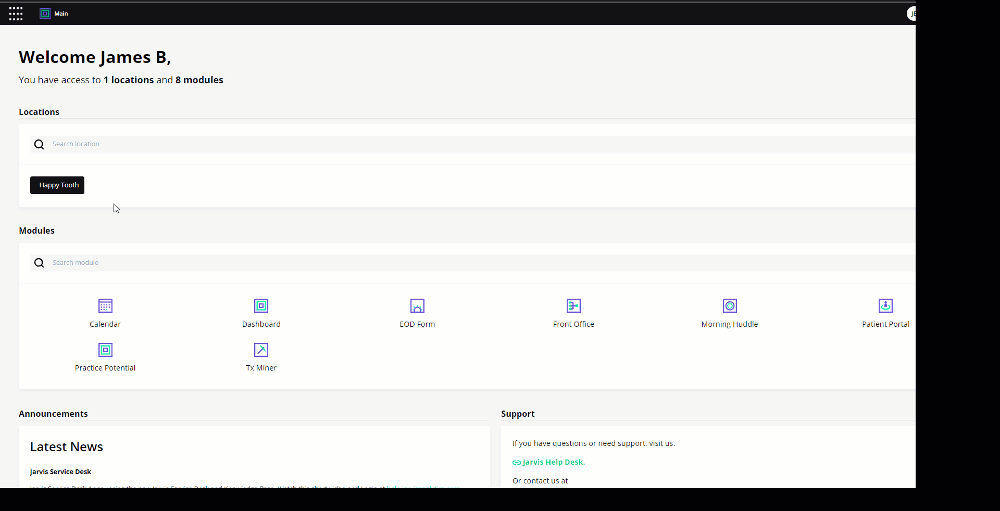
Not sure what setting your Jarvis Analytics platform is based on? Find out by going to the Main page of Jarvis and opening up your location information card.
Instructions:
This guide is broken down by which report type your integration is based upon. For Dentrix Ascend, you will be accessing three locations for these reports. The Aging Receivable report, Standard Reports and Analysis Ledger Report Builder in the Power Reports section. Use the section below for how to generate the reports (depending on your report type), and then apply the correct columns, rows and filters to build the report you need.
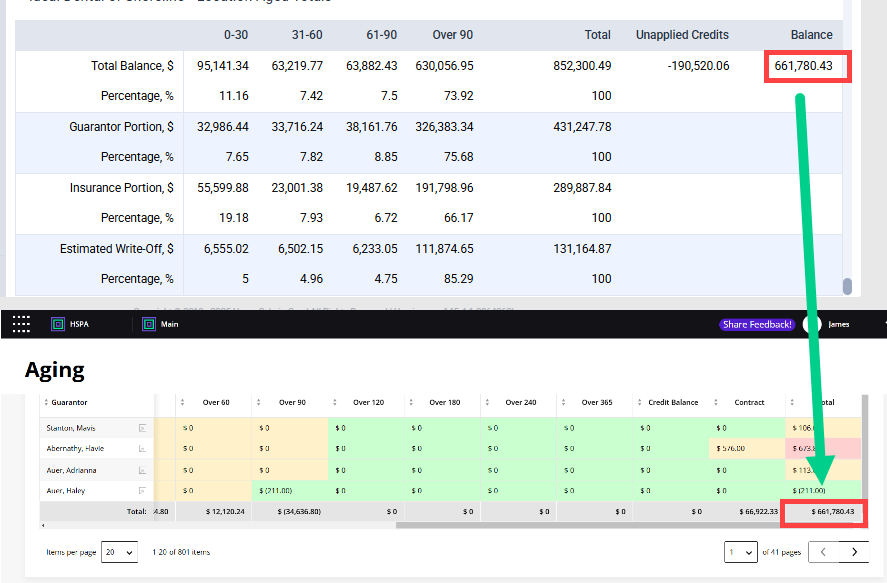
Aging
In this section, we will cover:
- How the Aging Receiveable Report can be generated in Dentrix Ascend
- How to find the same data in the Aging Module in Jarvis, and how you can find and compare data between the two programs
Before you begin, there are some limitation:
- Only the Totals column will match between Ascend and the Aging module; other age buckets (current, over 30, over 60, over 90) may not align.
- Ascend syncs with Jarvis once per day, so creating the Aging Receivable report at a different times will show different metrics.
Instructions:
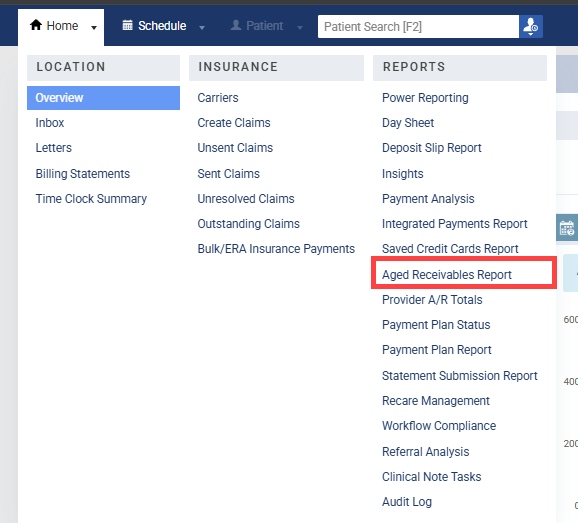
- Go to Reports -> Aged Receivables Reports
- Select the locations and set the date
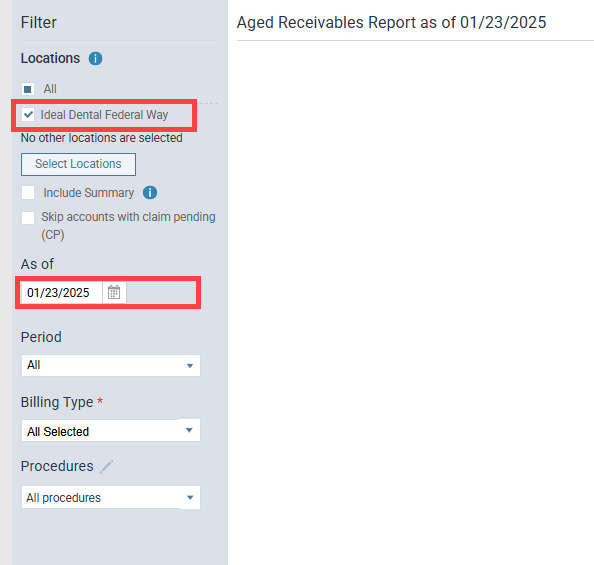
- Go to the Aging module in Jarvis Analytics. Compare the report balance with the Totals column in Aging Module of Jarvis Analytics.
Adjustments
In this section, we will cover:
- How the you can locate and compare your data for Adjustments in Dentrix Ascend
- How to find the same data in the Dashboard Module in Jarvis, and how you can find and compare data between the two programs
Instructions: Select the tab with your report date type.
- Modified Date
- Transaction Date
Modified Date
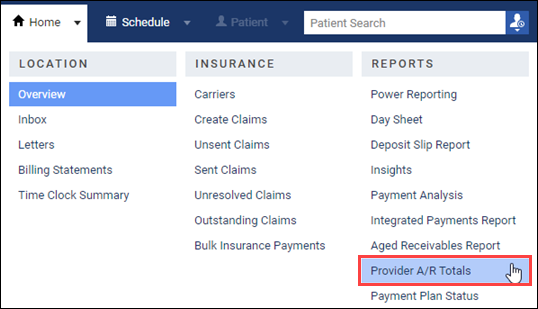
- Once you are in Dentrix Ascend Home Page, Go to Home -> Provider A/R Totals

- While in the Provider A/R Totals page, change the settings to the following information
- LOCATIONS: Select Location(s)
- DATE RANGE: Select Date Range
- PROCEDURES: All
- CHARGE ADJUSTMENTS: All
- CREDIT ADJUSTMENTS: All
- INCLUDED UNAPPLIED CREDITS: Yes

- To get your Total Adjustments:
- Production Charge Adjustments + Production Credit Adjustments = Total Adjustments
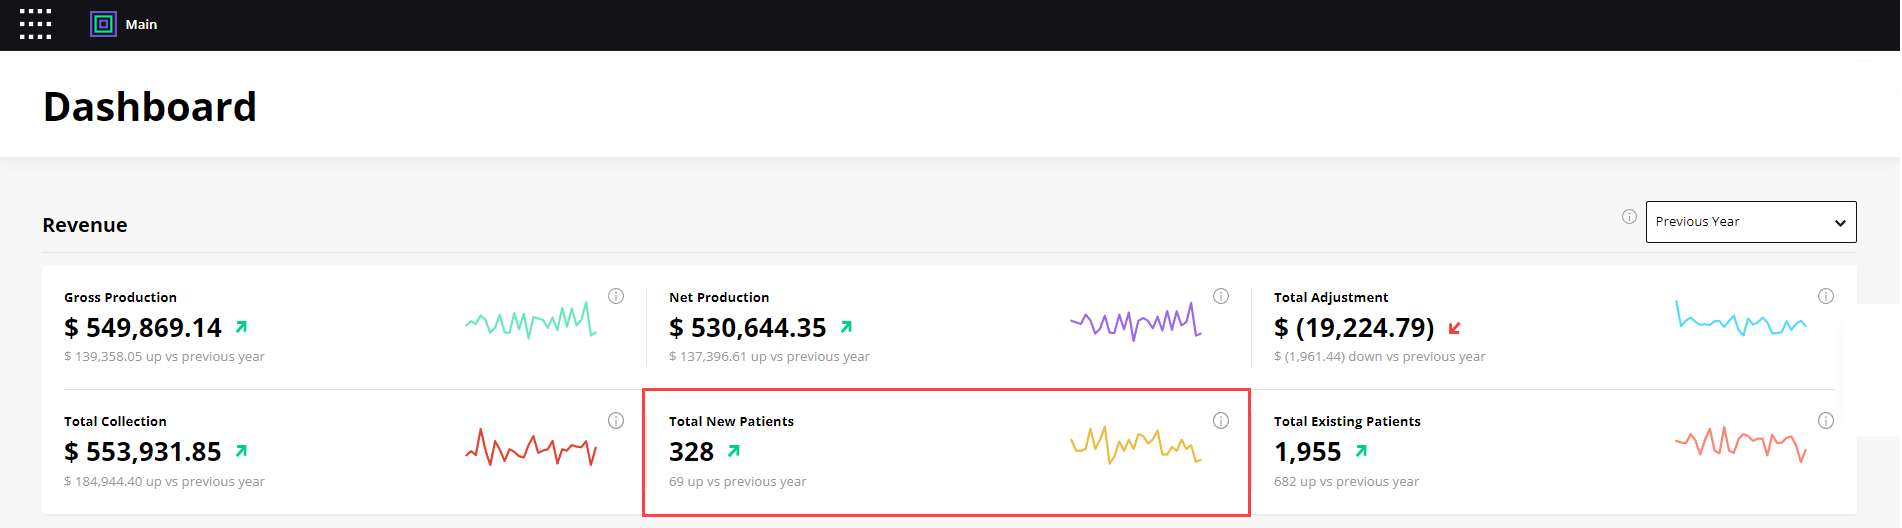
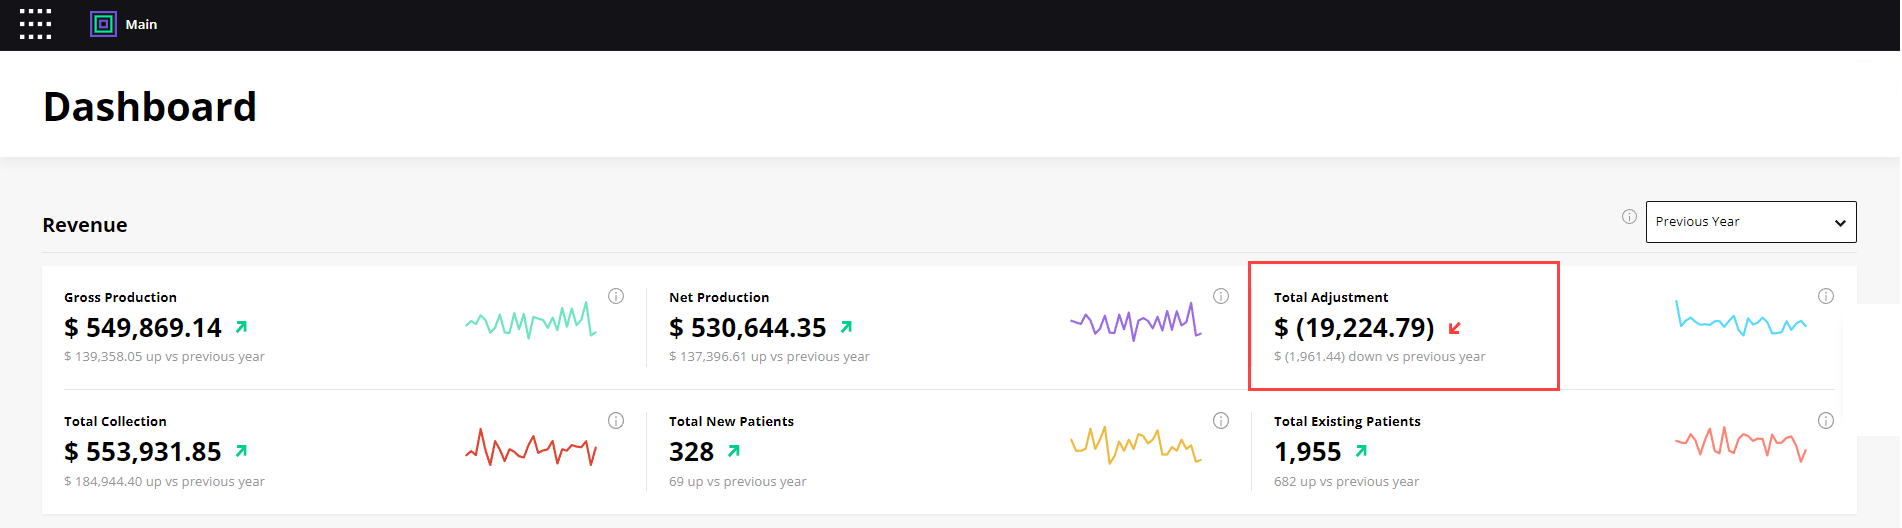
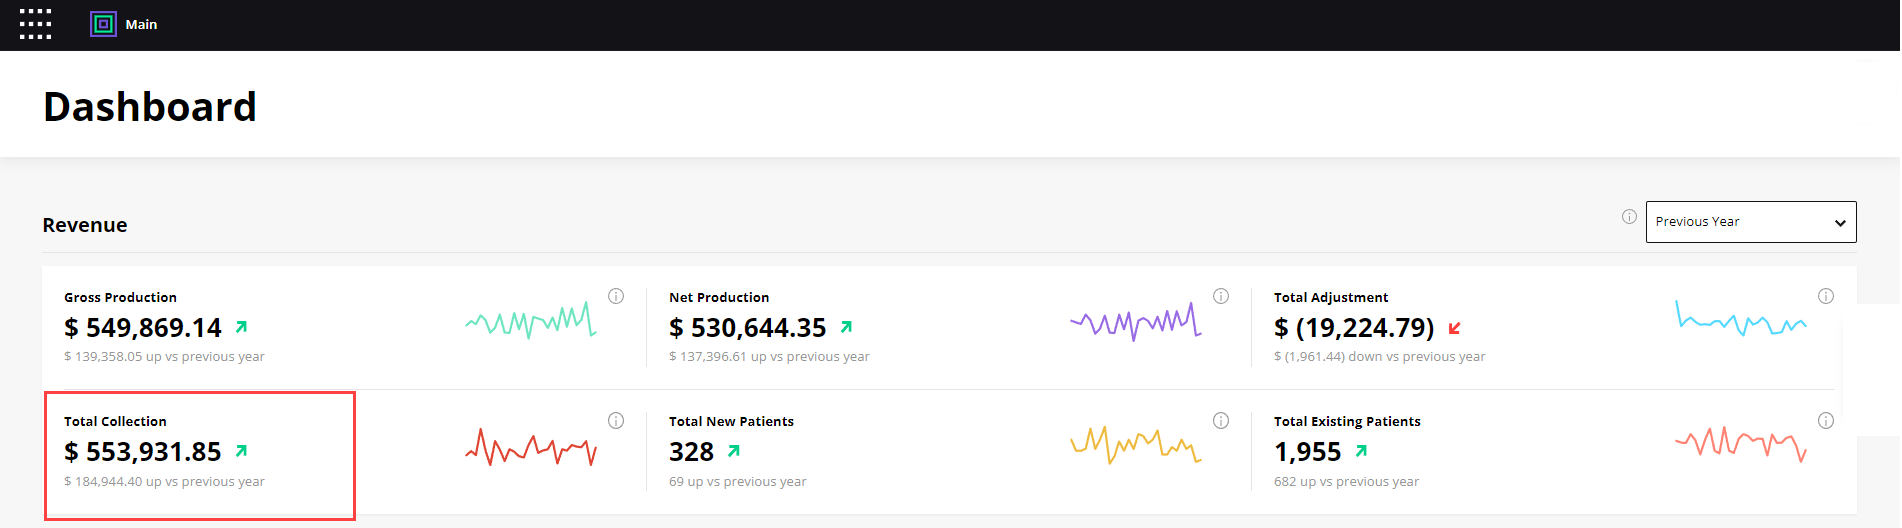
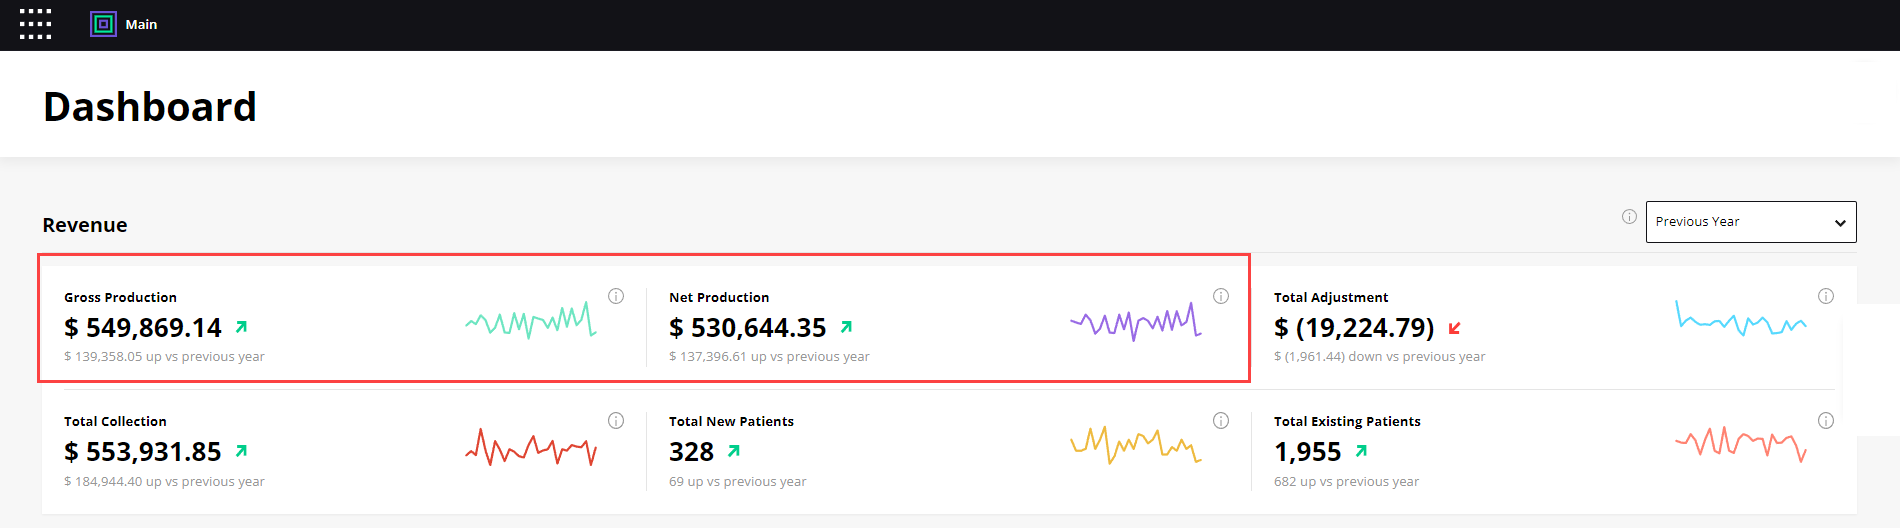
- In Jarvis you can locate your Adjustments in the Dashboard Module

Transaction Date
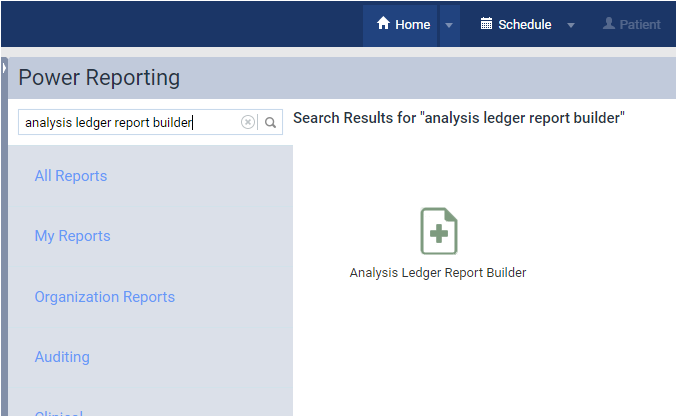
- Once you are in Dentrix Ascend Home Page, Go to Home -> Power Reporting

- Once Power Reporting is open, search for, then open Analysis Ledger Report Builder
- With the Report Builder open, select and enter the following parameters into your Rows, Columns, Measure and Filters.
- Rows
- DATE: Transaction Date
- Production or Collection
- Category
- SubCategory
- Measures
- Amount
- Count
- Average Write-off
- CATEGORY: includes Charge Adjustments and Credit Adjustments
- Filters
- Date (trans)
- Category – Includes Charge Adjustments and Credit Adjustments
- Location – Same as location listed in Jarvis
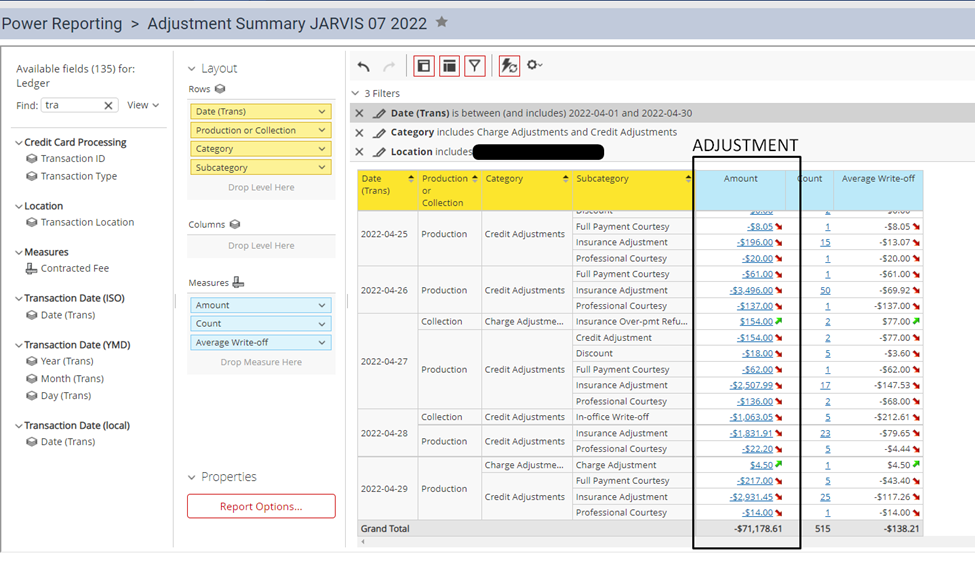
- Rows
- Your Adjustment Amount is in the Amount column, in the Grand Total row.
- With your report completed, you should have matching metrics with your Jarvis Dashboard module
Notes:
For provider adjustment, provider production report adjustment should be used. Adjustment summary should only be used for office totals.
Collections
In this section, we will cover:
- How the you can locate and compare your data for Collections in Dentrix Ascend
- How to find the same data in the Dashboard Module in Jarvis, and how you can find and compare data between the two programs
Instructions: Select the tab with your report date type.
- Modified Date
- Transaction Date
Modified Date
- Once you are in Dentrix Ascend Home Page, Go to Home -> Provider A/R Totals
- While in the Provider A/R Totals page, change the settings to the following metrics
- LOCATIONS: Select Location(s)
- DATE RANGE: Select Date Range
- PROCEDURES: All
- CHARGE ADJUSTMENTS: All
- CREDIT ADJUSTMENTS: All
- INCLUDED UNAPPLIED CREDITS: Yes
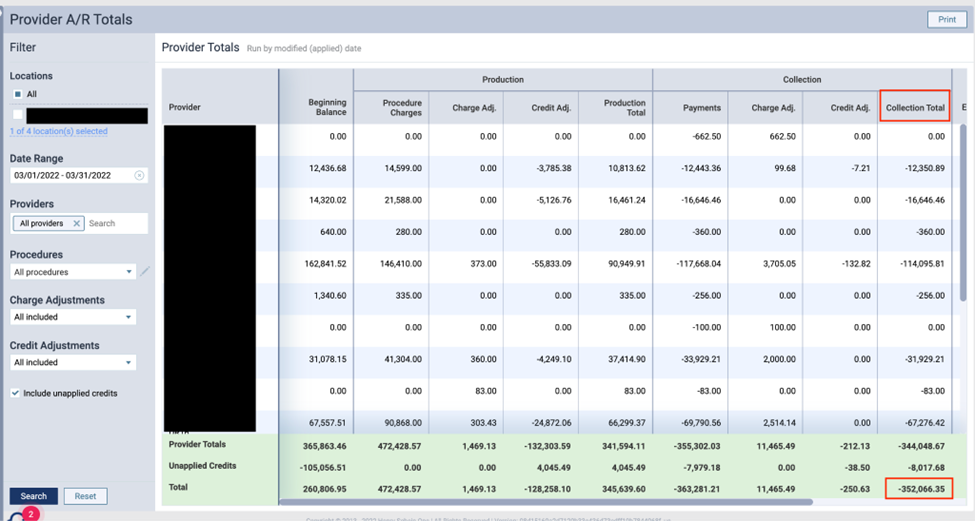
- To get your Collections total look at the bottom of the Collections Total column
- In Jarvis, you can locate your Adjustments in the Dashboard Module or the Collections view in the Front Office module. For Jarvis Enterprise users, you can find all this in the Operations and Financials module.
Transaction Date
- Once you are in Dentrix Ascend Home Page, Go to Home -> Power Reporting
- Once Power Reporting is open, search for, then open Analysis Ledger Report Builder

- With the Report Builder open, select and enter the following parameters into your Rows, Columns, Measure, and Filters
- Rows
- Location
- Date(Trans)
- Provider
- Column
- Category
- Measures
- Amount
- Filters
- Date (trans)
- Production or Collection includes Collection
- Location – Same as location listed in Jarvis
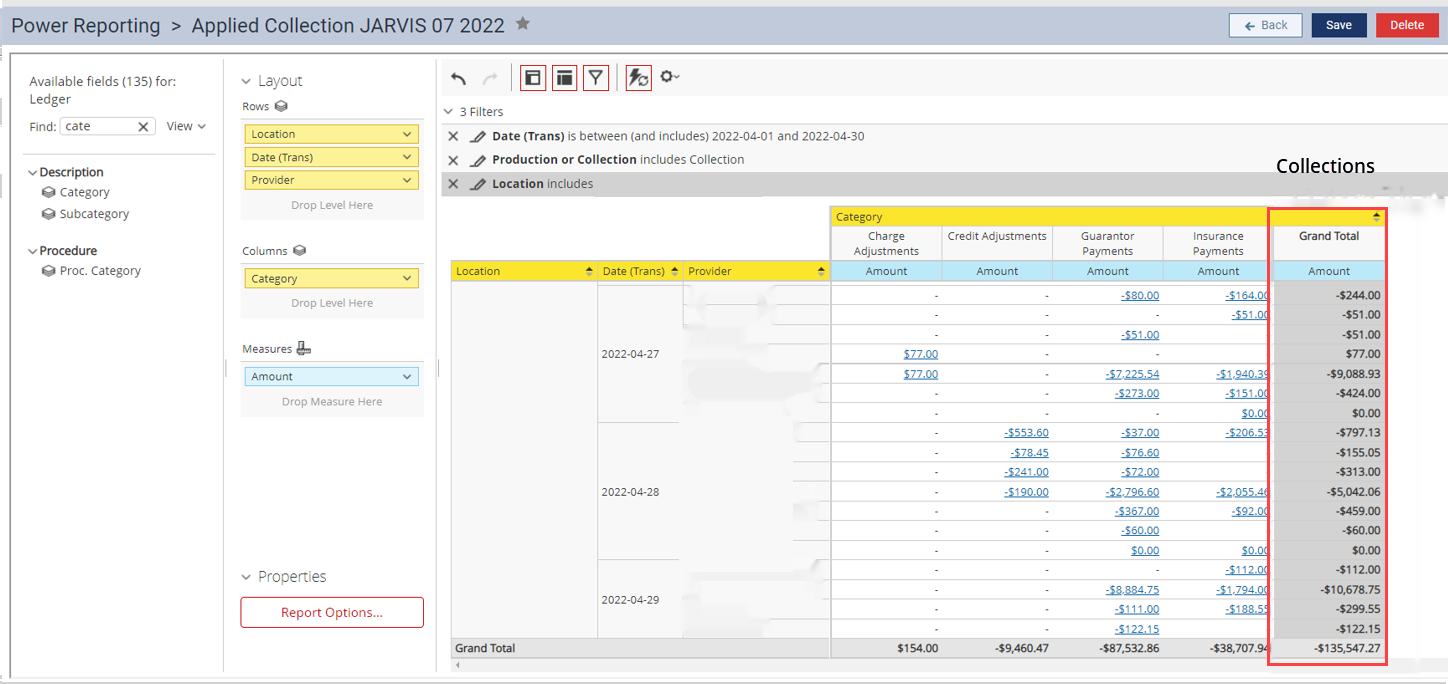
- Rows
- To Find your Total Collections amount look for the Grand Total column.
- With your report completed, you should have matching metrics with your Jarvis Dashboard module

Gross and Net Production
In this section, we will cover:
- How the you can locate and compare your data for Gross Production in Dentrix Ascend
- How to find the same data in the Dashboard Module in Jarvis, and how you can find and compare data between the two programs
Instructions: Select the tab with your report date type.
- Modified Date
- Transaction Date
Modified Date
- Once you are in Dentrix Ascend Home Page, Go to Home -> Provider A/R Totals

- While in the Provider A/R Totals page, change the settings to the following information
- LOCATIONS: Select Location(s)
- DATE RANGE: Select Date Range
- PROCEDURES: All
- CHARGE ADJUSTMENTS: All
- CREDIT ADJUSTMENTS: All
- INCLUDED UNAPPLIED CREDITS: Yes
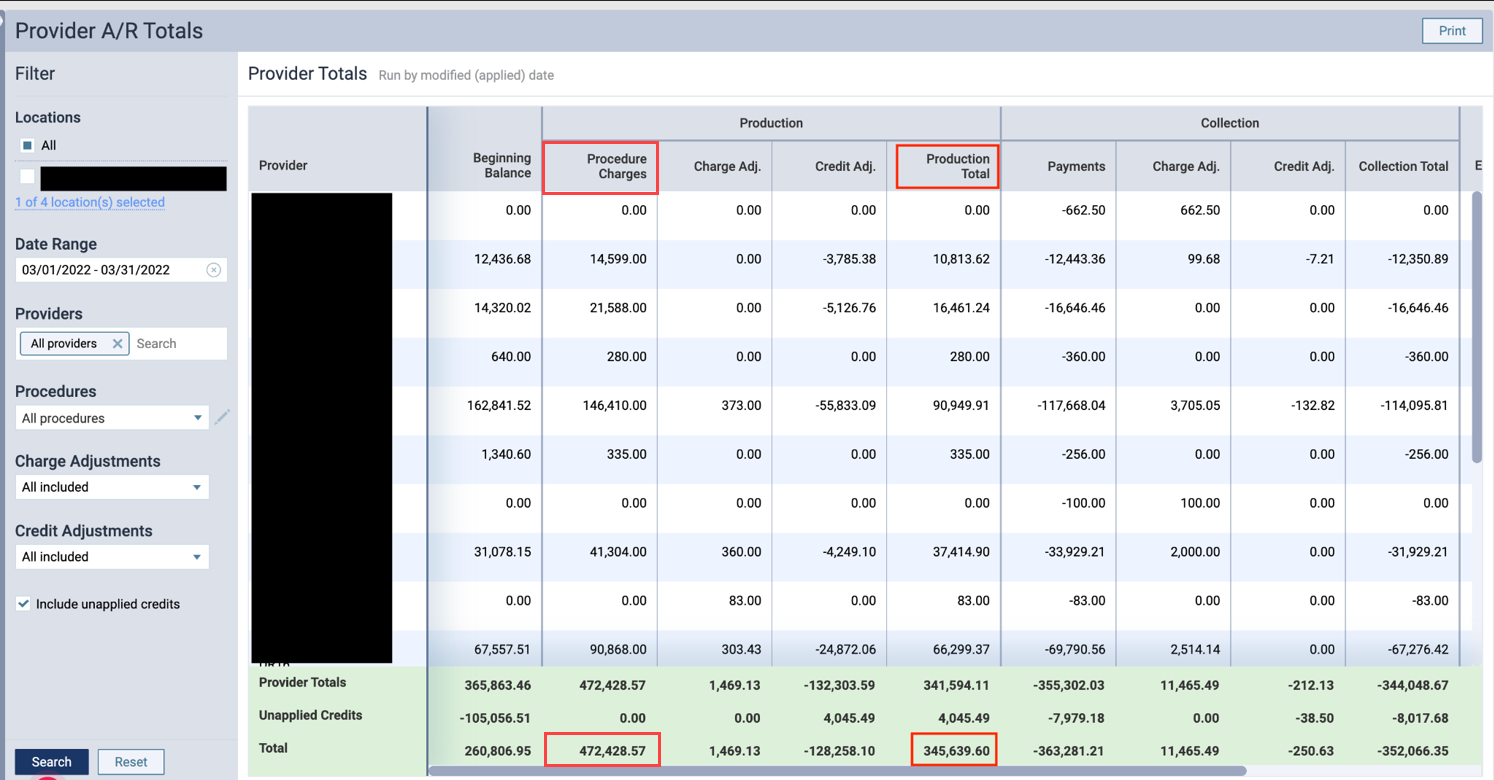
- To get your Total Gross Production Look at the Total Procedure Charges, for your Net Production, look at total for Production Total column.
- In Jarvis you can locate your Gross Production in the Dashboard Module

Transaction Date
- Once you are in Dentrix Ascend Home Page, Go to Home -> Power Reporting

- Once Power Reporting is open, search for, then open Analysis Ledger Report Builder

- With the Report Builder open, select and enter the following parameters into your Rows, Columns and Measure.
- Rows
- Date(Trans)
- Provider
- Location
- Column
- Category
- Measures
- Amount
- Filters
- Date (trans)
- Production or Collection includes Collection
- Location – Same as location listed in Jarvis
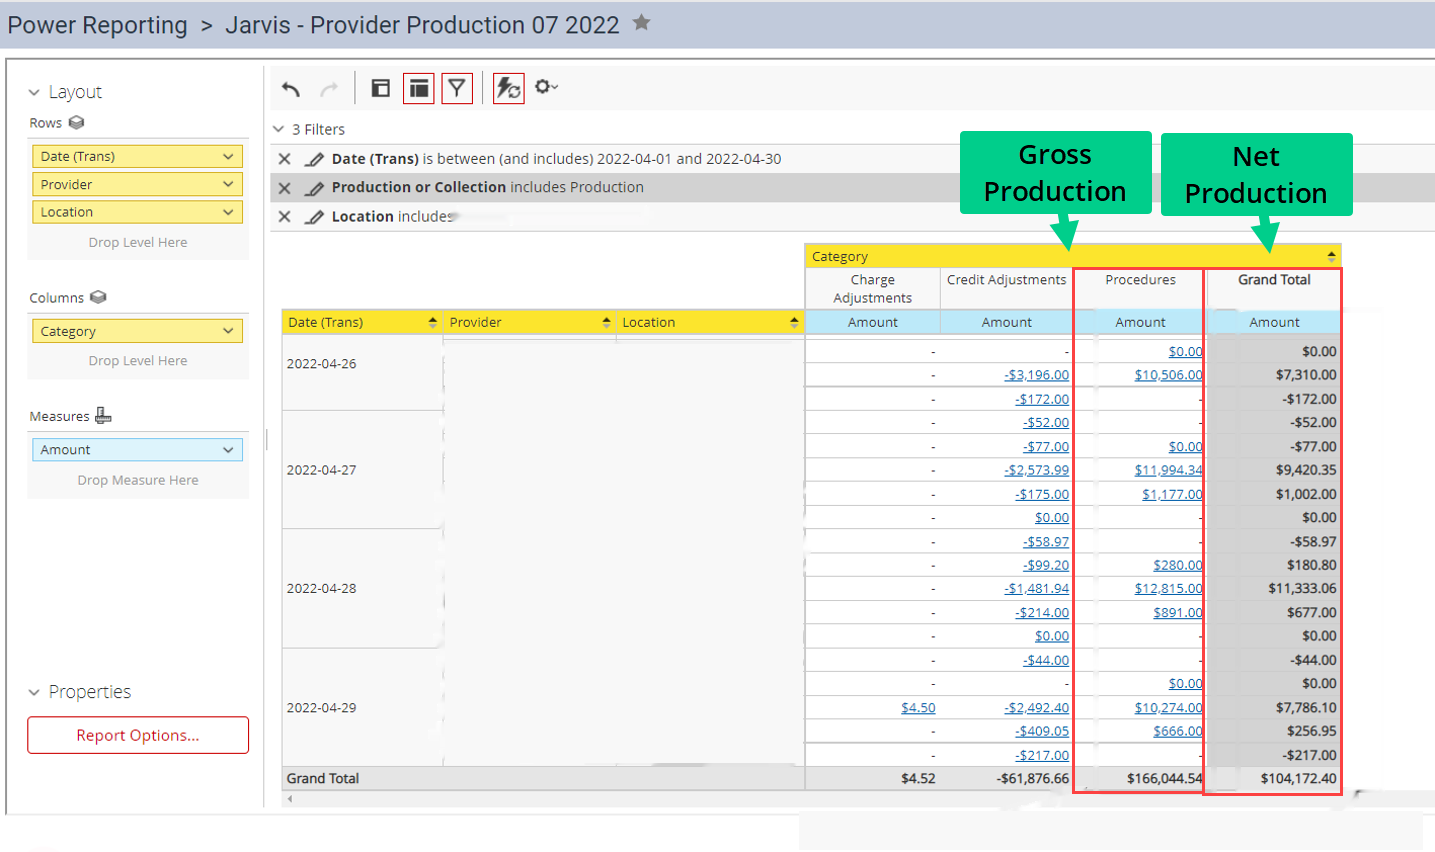
- Rows
- To get your Total Gross Production Look at the Total Procedure Charges, and to look at your Net production, look at the Grand Total Column
- With your report completed, you should have matching metrics with your Jarvis Dashboard module.
- Once you are in Dentrix Ascend Home Page, Go to Home -> Power Reporting
New Patients
In this section, we will cover:
- How the you can locate and compare your data for New Patients in Dentrix Ascend
- How to find the same data in the Dashboard Module in Jarvis, and how you can find and compare data between the two programs
Transaction Date
- Once you are in Dentrix Ascend Home Page, Go to Home -> Power Reporting

- Once Power Reporting is open, search for, then open Analysis Ledger Report Builder

- With the Report Builder open, select and enter the following parameters into your Rows, Columns, Measure and Filters.
- Rows
- DATE: Transaction Date
- Columns
- Location
- Specialty
- Provider
- Measures
- Patient Count
- Filters
- Date (trans)
- On First Visit includes true
- Category – Includes Charge Adjustments and Credit Adjustments
- Location – Same as location listed in Jarvis
- Provider excludes n/a
- Revision History includes Current
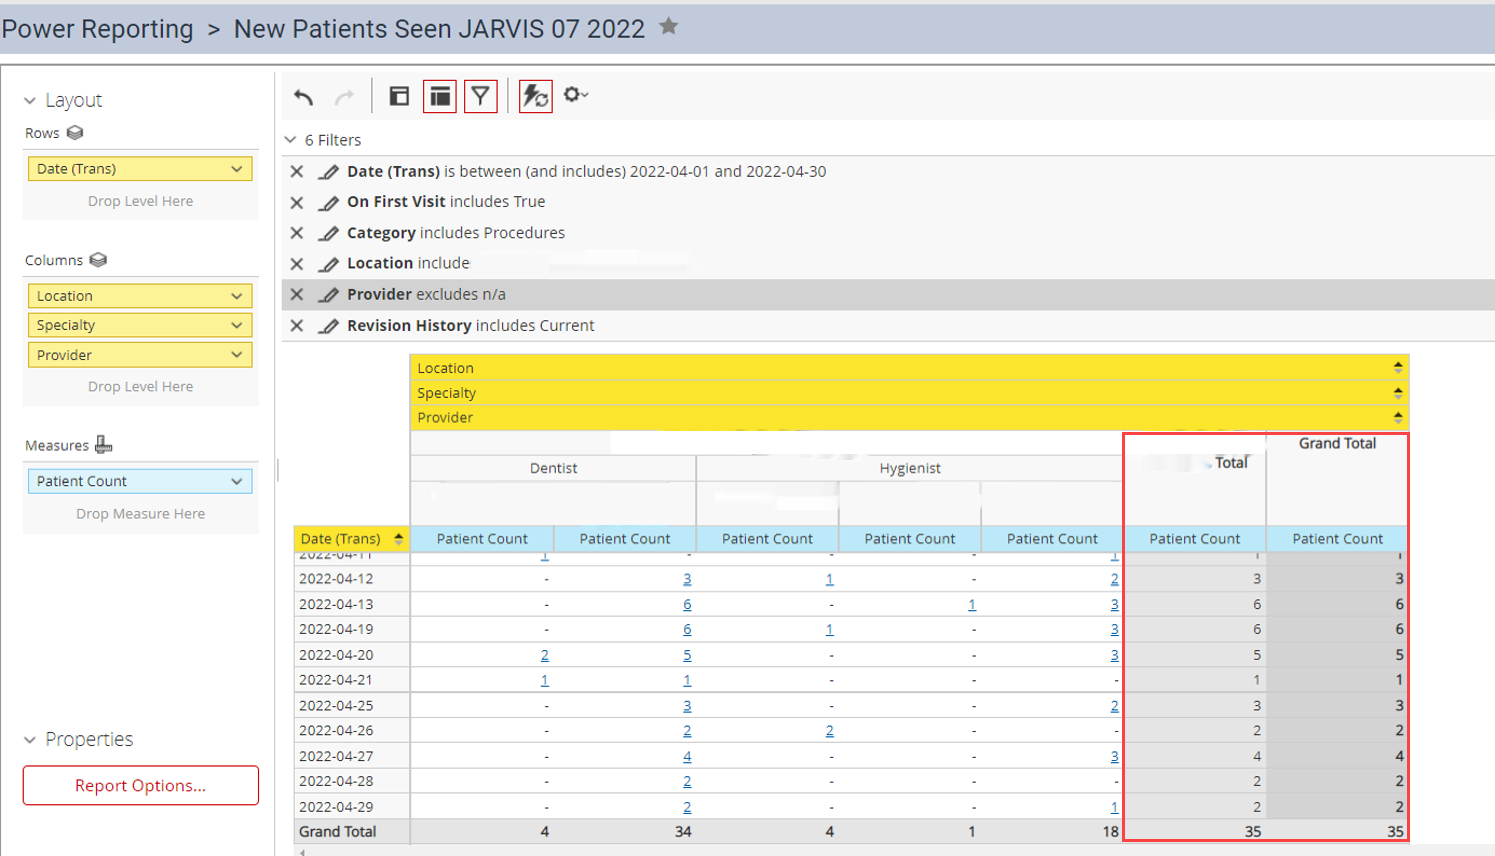
- Rows
- Your New Patient total is in the Grand Total amount, at the bottom in the Grand Total column.
- With your report completed, you should have matching metrics with your Jarvis Dashboard module