Create Your Own KPI: A Report Guide
Introduction
The following sections highlight how you can use the new “Create Your Own KPI” tool to create KPIs that cater to the immediate analytic needs of your practice. This new tool offers a straightforward, user-friendly method to create, track,
and analyze the key performance indicators unique to your practice. In this guide, you’ll learn how to use the “Create Your Own KPI” tool to gain insights into your practice’s performance. Whether you want to track financial metrics,
understand how to better serve your patients, or want to better evaluate the day-to-day operations of your practice, the “Create Your Own KPI” tool will help you make data-driven decisions easily and precisely.
Disclaimer
This initial version of the tool provides essential features that will evolve and expand to meet the needs of your practice as it continues to grow.
Creating Custom KPIs
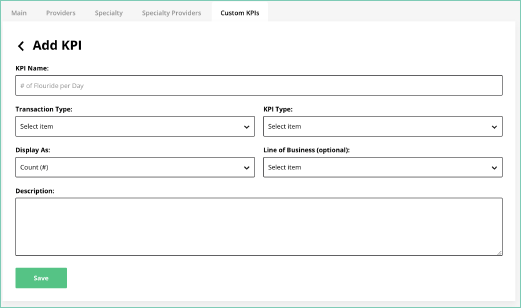
- Navigate to the Configuration module, select KPIs, and then click the Customs KPI
- Select Add KPI.
- Under KPI Name, type a descriptive and easily identifiable name.
- Under Transaction Type, select one of the following based on what metric you want to track:
- Procedure Code
- Adjustment Type
- Payment Type
- To determine where your KPI appears in the KPI module, under KPI Type, select one of the following:
- Hygiene
- Doctor
- Office
- Specialties
- To determine the type of data to display, under Display As, select one of the following:
- Count (#)
- Dollar ($)
- (Optional) To apply a line of business filter, under Select a Line of Business, select one of the following:
- Doctor
- Hygiene
- Oral Surgery
- Invisalign
- Ortho
- Prosthetics
- Others
- Perio
- Endo
- Pedo
- Under Description, do one or more of the following:
- Type a brief description to provide additional context or details about what the KPI is tracking. Doing so can clarify the KPI’s purpose for yourself and others.
- Type the relevant procedure codes, adjustment types, or payment types. Use the actual procedure codes from your Practice Management System. You can add multiple procedure codes to a single KPI.
- Click Save.
Managing Custom KPIs
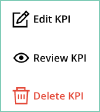
- Edit a KPI.
- As necessary, modify your KPIs to reflect any changes in your practice or goals.
- Review a KPI.
- Review your KPIs regularly to track performance and make data-driven decisions.
- Delete a KPI.
- Delete any KPIs that are no longer relevant to your practice.
Enabling or Disabling Custom KPIs
- To enable a KPI, click the toggle switch. When a KPI is enabled, the toggle switch appears in green with a check mark. KPIs that you enable here are visible in the KPI module.

- To disable a KPI, click the toggle switch. When a KPI is disabled, the toggle switch appears in gray. Disabled KPIs are not visible in the KPI module.

Identifying Custom KPIs
- In the KPI module, custom KPIs are identified by a file icon.

Sample Custom KPIs

Tracking the Number of iTero Scans
To create a KPI that tracks the number of iTero scans completed by hygienists, complete the following steps:
- Under KPI Name, type Hygiene iTero Scans.
- Under Transaction Type, select Procedure Code.
- Under KPI Type, select Hygiene.
- Under Display As, select Count (#).
- (Optional) Under Line of Business, select Hygiene.
- Under Description, type a brief description of the custom KPI, such as “Displays the number of iTero scans completed by a hygienist.” Type the associated procedure code: D0801.
- Click Save.
Tracking the Amount of Patient Courtesy Adjustments
To create a KPI that tracks the number of patient courtesy adjustments, complete the following steps:
- Under KPI Name, type Professional Courtesy Adjustments.
- Under Transaction Type, select Adjustment Type.
- Under KPI Type, select Office.
- Under Display As, select Dollar ($).
- (Optional) Under Line of Business, select None.
- Under Description, type a brief description of the custom KPI, such as “Displays the amount of professional courtesy adjustments posted.” Type the associated procedure code: ADJ0013.
- Click Save.
Tracking the Amount of Insurance Credit Card Payments
To create a KPI that tracks the amount of insurance credit card payments, complete the following steps:
- Under KPI Name, type Insurance Credit Card Payments.
- Under Transaction Type, select Payment Type.
- Under KPI Type, select Office.
- Under Display As, select Dollar ($).
- (Optional) Under Line of Business, select None.
- Under Description, type a brief description of the custom KPI, such as “Displays the amount of Insurance Credit Card Payments posted.” Type the associated procedure code: PMT-INS-CC.
- Click Save.